How to Add a Second Button to Navigation in Squarespace
Have you ever wanted to add a second button to navigation in Squarespace?
Maybe you or your client has a special offer or product or a really awesome lead generator they want to highlight.
While I do recommend optimizing your website’s navigation to improve engagement and reducing the clutter in this strategic area of your website, it’s okay to add a second button if it’s relevant to something happening in your business.
I DO caution you to use this very carefully—it’s critical that this button lead the visitor to a place that will benefit both your target audience and you.
How to Add a Second Button to Navigation in Squarespace
To add a second button to the navigation menu in Squarespace, all you have to do is add a little bit of CSS—super easy.
Here’s how you do it:
Select Website > Website tools > Custom CSS
Copy the code below (scroll down to where it says ‘Code Snippet’)
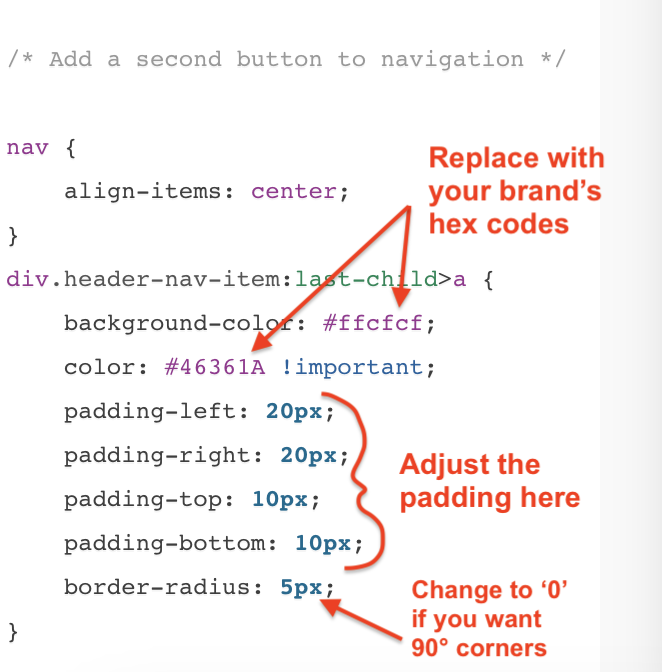
Change the colors to match your brand by adding the hex codes of your brand colors for the background color and the text color
Adjust the padding so it's more in line with the padding of the primary button
I've left a space for you to add a border radius if you want to—you can change it to 0 if you prefer 90° corners
This code snippet will create a button of the last item in your navigation menu
Code Snippet
/* Add a second button to navigation */

  nav {
    align-items: center;
}
div.header-nav-item:last-child>a {
    background-color: #ffcfcf;
    color: #46361A !important;
    padding-left: 20px;
    padding-right: 20px;
    padding-top: 10px;
    padding-bottom: 10px;
    border-radius: 5px;
}
Was this helpful?
Are you doing to use this on your website or your client’s website? If so, what will you use it for? Share your thoughts in the comments. 👇
This page contains affiliate links
Like this post?


